I often see powder coating lines “installed” but not truly “ready.” Then the first month becomes a firefight of dust, defects, and missed delivery. I also see projects fail because the team started installing equipment before they locked the building conditions, process window, and acceptance rules.
To install a powder coating line successfully, I lock three things first: the building boundaries, the process window, and the delivery/acceptance boundaries. After that, I follow a strict installation sequence, and I validate performance with data during trial runs.
From our factory view at Ketu, most “failures” are not because installers lack skill. The failure is usually upstream: missing inputs, unclear interfaces, no single owner, and trial production without a real acceptance checklist. When those are wrong, the line can look complete but still cannot hold quality or takt time.
Below I answer four questions that come up every time during commissioning. I will keep the language direct and practical, so you can turn this into a site checklist.
What Is the Most Common Problem When Powder Coating?
People often say the most common problem is “orange peel” or “thin edges.” In my experience, the most common root cause is not the visible defect. The root cause is instability: unstable surface condition, unstable grounding, unstable airflow, or unstable curing.
The most common problem in powder coating is inconsistent results, and it is usually caused by unstable surface preparation, poor grounding, unstable booth airflow, or an oven that does not deliver the required cure on real parts.
When a new line is installed, the team wants to run product fast. But if you skip the stability checks, defects will look random. Then people chase the gun settings every hour. That wastes time and hides the true cause.
The “top root causes” I see during new-line startups
| Symptom you see | What usually causes it | What I check first |
|---|---|---|
| Thin edges / poor wrap | weak grounding, hanger contact | hanger contact points, earth resistance |
| Dust in finish | airflow not balanced, poor filtration | booth negative pressure, filter loading |
| Pinholes / bubbles | moisture, oil, contamination | pretreatment records, dry-off effectiveness |
| Under-cure | part temp not reaching target | part temperature curve, dwell time |
| Color contamination | booth dead zones, bad clean-out | clean-out path, recovery stability |
Why this matters for installation success
If you do not plan these checks into commissioning, you will “fix” issues by luck. A week later, the defect returns. A successful install means the process stays stable after shifts change and after the season changes.
What Is the 7 Tank Process for Powder Coating?
The “7 tank process” is a common pretreatment line layout used before powder coating, especially for steel and outdoor durability. Different factories label tanks differently, but the concept is the same: clean, rinse, condition, convert, rinse, and protect, then dry.
A typical 7-tank pretreatment process includes stages for degreasing, rinsing, surface conditioning, conversion coating, rinsing, passivation or final rinse, and then dry-off before powder application.
I always tell fabricators one thing: pretreatment is not optional if you want stable adhesion and corrosion resistance. If you do welded carbon steel, oily parts, rust spots, or outdoor use, pretreatment is the quality foundation. A better spray gun cannot rescue a weak surface.
A practical 7-tank example (one common version)
This is a common pattern. Your chemical supplier may adjust names and chemistry, but the flow logic stays similar.
| Tank # | Stage | Purpose | Installation/commissioning focus |
|---|---|---|---|
| 1 | Degrease (alkaline) | remove oil and soil | concentration control, heating, spray pressure |
| 2 | Rinse 1 | remove cleaner carryover | flow rate, overflow, conductivity target |
| 3 | Rinse 2 or desmut (as needed) | improve cleanliness | stable water quality, nozzle coverage |
| 4 | Surface conditioning | improve conversion uniformity | dosing stability, contact time |
| 5 | Conversion coating | create bonding and corrosion layer | temperature, pH, titration routine |
| 6 | Rinse / DI rinse | reduce residue | conductivity and contamination control |
| 7 | Passivation / seal (optional) | improve corrosion performance | chemistry stability, dwell time |
Then you go to dry-off oven. I treat dry-off as part of pretreatment, not a separate “nice to have.” If water remains in seams and tubes, defects will appear later in curing.
The installation mistake that causes most pretreatment trouble
The mistake is not tank steelwork. The mistake is utilities and interfaces:
- drainage slope and capacity are wrong
- exhaust and mist collection are weak
- pump sizing and spray coverage are not validated
- there is no daily control method for concentration and pH
During installation, you must lock these before you run product. If you do not, the line will “run,” but quality will drift.
What Is the Powder Coating Process Step by Step?
Many guides list steps, but a successful installation needs more than a list. It needs a commissioning plan that tests each step in the right order, and it needs data records that prove the process window is stable.
Step by step, powder coating is: part preparation and pretreatment, dry-off, powder application, curing, cooling, inspection, and packing—supported by stable handling and grounding through the whole flow.
For installation success, I also follow a strict startup sequence. I do not jump to spraying product on day one.
The safest installation and commissioning order (what we follow on site)
1) Layout marking + foundations + embeds
I confirm conveyor line level, rail supports, duct supports, floor flatness, and lifting path.
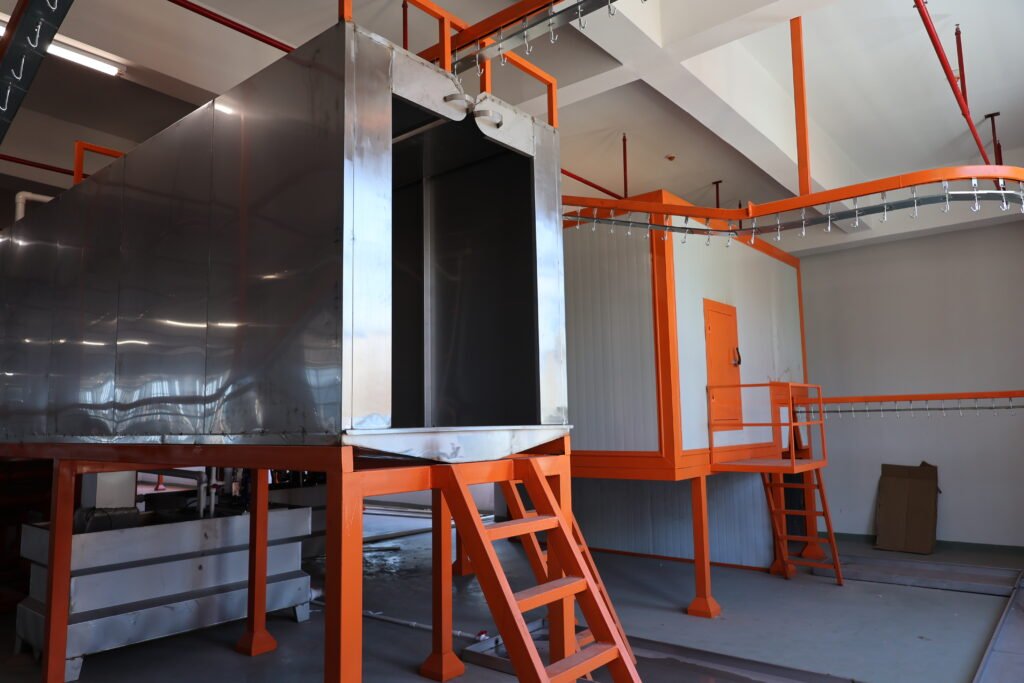
2) Install the conveyor first
The conveyor is the skeleton. Everything else aligns to it. If you install booths and ovens first, you will fight alignment later.
3) Install pretreatment and dry-off
Water systems go first. Drainage and ventilation must be proven early.
4) Install booth + recovery and dust collection
I focus on airflow, negative pressure, and dead zones. This decides dust defects and color change speed.
5) Install curing oven
I confirm sealing, insulation, temperature control, exhaust, and safety interlocks for burners if used.
6) Electrical, sensors, and safety interlocks
I test E-stops, door switches, over-temp, fan interlocks, and any fire safety logic.
7) Commission in three phases
- empty run
- run with hangers
- run with product and powder
The trial-run data I require (no guessing)
I never accept “it looks fine.” I accept records.
| Trial item | What I measure | Why it proves readiness |
|---|---|---|
| Film thickness | multiple points: edges, backs, recesses | proves coverage stability |
| Cure | part temperature curve + effective dwell | proves cure completion |
| Grounding | contact stability and resistance trend | proves transfer efficiency |
| Color change drill | changeover time + powder loss | proves mixed-batch capability |
| Shift stability | continuous run for at least one shift | proves low drift over time |
If you keep these records, you can stabilize faster. You also have proof for future troubleshooting.
What Is the Hardest Color to Powder Coat?
People often say “white” is hardest, or “bright red” is hardest. In practice, the “hardest color” depends on what you mean by hard: hard to keep clean, hard to cover, or hard to keep consistent across batches.
The hardest colors to powder coat are usually very light colors (like white) and certain bright colors, because they show contamination easily, can need stronger coverage control, and can reveal process drift faster than darker colors.
Light colors show everything:
- a small amount of residual powder in a booth corner
- dust from the workshop
- oil trace from handling
- inconsistent film build on edges
Some bright colors also need careful control to avoid shade variation. That can happen if cure and film thickness drift. Dark colors often hide small problems. White and light gray do not.
Why “hard color” is often a line design issue
If a line has:
- dead corners in the booth
- weak negative pressure control
- unstable recovery clean-out
- poor hanger grounding
then light colors will expose it on day one.
A practical color-change readiness table
| Situation | What you should design for | What goes wrong if you don’t |
|---|---|---|
| Frequent change to white | fast clean-out, low dead zones | contamination and complaints |
| Small batch bright colors | stable cure + stable film build | shade drift, rework |
| Mixed colors in one shift | disciplined SOP + airflow stability | quality swings per operator |
This is why, during installation, I always include a color-change drill. If your business is high-mix, you must test this before handover.
Conclusion
A successful powder coating line install is won before installation: lock building, process, and acceptance boundaries, follow the right install order, and prove stability with trial-run data.