Powder Coating of Guardrails: Process Principles, Quality Standards, and Best Practices
Guardrails are one of the most exposed metal products in any infrastructure system. Whether installed along highways, bridge decks, balconies, or industrial platforms, they face constant weathering, UV exposure, temperature fluctuations, and mechanical stress. This is precisely why powder coating—rather than traditional liquid paint—has become the gold standard for guardrail protection worldwide.
Powder coating is a surface finishing process that applies dry powder particles to metal surfaces through electrostatic attraction, then heats them to form a durable protective layer. For guardrails, this method provides superior corrosion resistance, impact durability, and uniform finish compared to traditional liquid paint, making it ideal for outdoor safety applications where weather exposure and mechanical stress are primary concerns. The process involves pre-treatment to remove rust and contaminants, electrostatic powder application, and thermal curing at controlled temperatures, resulting in coatings that resist chipping, fading, and rust for extended outdoor service life.
From our experience manufacturing electrostatic powder coating lines for guardrail producers across multiple continents, we've learned that the difference between a guardrail that stays beautiful for 15 years and one that fails after 3–5 years often comes down to one thing: process control. Not price. Not fancy equipment. Process control.
This guide walks through the complete powder coating process for guardrails, explains why certain steps matter far more than suppliers usually admit, shares the quality standards you should enforce, and reveals the defects we see most often in the field—and how to prevent them.
What is Powder Coating and Why It's Essential for Guardrail Protection
Powder coating is fundamentally different from liquid paint. Instead of spraying a wet film that relies on solvent evaporation, powder coating uses electrostatic charge to bond fine powder particles directly to a grounded metal surface. Once the powder layer is built up, the entire assembly enters a heated curing oven where the particles melt, flow together, and chemically cross-link into a hard, continuous film.
For guardrails specifically, this matters because:
Uniform Coverage. A liquid paint sprayer creates film thickness variation depending on spray angle, gun distance, and surface geometry. Powder coating, when controlled properly, deposits a more consistent layer across flat surfaces, edges, and inside bends—exactly what long horizontal guardrail sections demand.
No Sagging or Runs. Liquid paint flows downward under gravity, especially on vertical or angled surfaces. Guardrail posts at 80–90 degrees won't see paint pooling at the bottom. Powder stays where it's sprayed.
Higher Corrosion Resistance per Micron. A 75-micron powder coating often outperforms a 150-micron liquid paint system in salt-fog testing. This is because powder cross-links more thoroughly and has fewer defects like pinholes or voids that allow rust penetration.
Environmental Compliance. No VOC emissions from solvent evaporation. No disposal headache. Overspray powder is recovered and reused, so material waste is minimal—typically 5–15% versus 30–50% for spray paint.
Speed to Sale. A guardrail can be powder-coated, cured, cooled, and packed within 2–4 hours. No multiple-day drying between coats. No waiting for full hardness before assembly.
For outdoor infrastructure applications like guardrails, where the product will see rain, salt spray, temperature cycling, and UV exposure for 10–20 years, powder coating is not a luxury—it's the rational choice.
Key Advantages of Powder Coating Over Traditional Liquid Coatings for Guardrails
The comparison table below summarizes why guardrail manufacturers are shifting away from traditional spray paint:
| Parameter | Powder Coating | Liquid Paint Spray | Why It Matters for Guardrails |
|---|---|---|---|
| Film Thickness Uniformity | ±25 microns typical | ±50+ microns typical | Thin spots on guardrails lead to early rust under high-stress areas |
| Salt-Fog Durability (ASTM B117) | 1000+ hours typical | 500–700 hours typical | Guardrails in coastal zones need proven longevity |
| Adhesion on Complex Geometry | Excellent on corners, inside bends, welds | Variable; thin at sharp edges | Guardrails have many weld lines and sharp edges where failure starts |
| Gloss Retention (UV Resistance) | Good to excellent (polyester/epoxy blends) | Moderate to poor (liquid acrylics fade faster) | Long-term appearance matters for projects with aesthetic requirements |
| Impact Resistance | High (film flexibility + hardness) | Moderate (more brittle when thin) | Guardrails take occasional impact; powder coating absorbs it better |
| Coverage per Application | 50–100 microns in one pass | 25–40 microns per pass; multiple passes needed | Faster cycle time, lower labor cost |
| Overspray Recovery | 90–95% reused | 30–50% waste | Cost savings on high-volume guardrail lines |
| Water Spot and Salt Sensitivity | Low (fully cured cross-linked film) | Higher (especially during initial cure) | Guardrails can be rained on immediately post-cure |
| Flammability/Safety in Shipping | Non-flammable powder | Flammable solvent-based spray | Easier logistics, no hazmat restrictions |
| Maintenance After Installation | Touch-up requires matching powder system | Touch-up can be done with brush paint or small spray gun | Field repairs are easier with liquid, but less critical with powder durability |
The most important advantage for guardrails is durability per application. One pass of powder coating (50–100 microns) often outlasts three passes of liquid paint in outdoor environments. For high-volume guardrail manufacturers, this translates to higher throughput, lower scrap, and fewer customer returns.
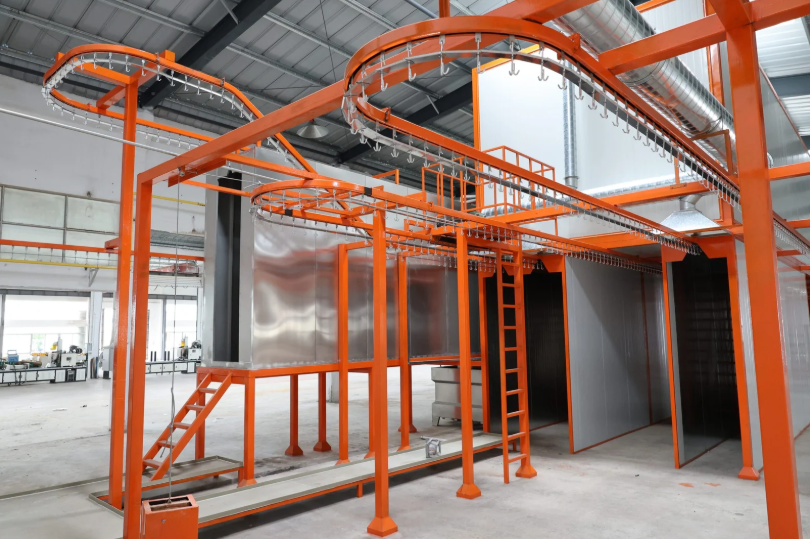
![immersion pre-treatment system]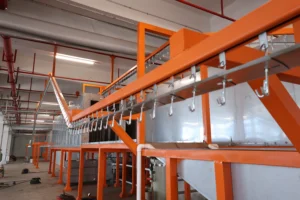
The Complete Powder Coating Process for Guardrails: From Surface Preparation to Quality Inspection
A guardrail's coating lifespan is determined at the very beginning—during pre-treatment—not at the spray booth or curing stage. This is the single most important principle we've learned from watching thousands of guardrail projects.
Surface Preparation: The Foundation for Coating Adhesion
Before any powder touches the metal, guardrail blanks must be cleaned to bare metal or to a tightly adhered oxide layer. Depending on material origin and storage, guardrails typically arrive at the coating facility with:
- Mill scale (dark gray oxidation from hot rolling)
- Rust (from outdoor storage or transport delays)
- Oil and machining residue (from shearing, welding, or fabrication)
- Dust and contaminants (from handling)
A typical pre-treatment sequence looks like this:
Degreasing Stage (55–65°C, alkaline solution)
The part is immersed or sprayed in an alkaline detergent bath to dissolve oils, coolants, and organic soils. For guardrails, this step cannot be rushed. We often see projects fail because fabrication shops under-estimate degreasing time—especially if the rails sat in a fabrication yard for weeks before coating.
Rinsing (warm water, medium pressure)
The degreasing bath must be completely removed, otherwise residual alkali will interfere with the phosphate layer formation.
Rust Removal (5–15% phosphoric acid, or mechanical if using shot blast)
For heavily rusted guardrails, acid pickling removes oxide and rust. For lighter surface oxide, a mild acid wash suffices. Alternatively, shot blasting or grit blasting can be used pre-treatment, but adds cost and complexity; most high-volume guardrail lines use chemical pickling because it's faster and more consistent.
Phosphatization (zinc or iron phosphate, 50–80°C)
This is critical. Phosphatization creates a thin crystalline conversion layer (15–35 microns) that:
- Prevents flash rusting (rust forming within minutes of the pickling step)
- Improves powder adhesion by 30–50%
- Acts as a secondary corrosion barrier if the powder is later damaged
For guardrails destined for salt-spray environments (coastal installations, road salt zones), the phosphate layer is not optional—it's mandatory.
Passivation/Sealing (optional but recommended for high-durability applications)
A light seal or passivation step locks the phosphate layer and prevents chalking.
Final Rinse (deionized or distilled water preferred)
Tap water salts or minerals left on the surface will create defects. This final rinse step is often where guardrail coating lines cut corners—and regret it when adhesion issues appear weeks later.
Drying (hot air, typically 60–80°C for 5–10 minutes)
The part must be completely dry before entering the spray booth. Any residual water will cause pinholes, blistering, and adhesion loss. For guardrails with internal channels or hollow sections, drying time must be extended.
Our perspective: Pre-treatment quality directly determines whether your coating will last 15 years or fail in 5. We've seen guardrails fail not because the powder was poor or the spray technique was wrong, but because pre-treatment was half-hearted. Don't skip steps, don't use old bath solutions, and don't rush drying. The cost of redoing a failed batch of guardrails is 10 times higher than the cost of doing pre-treatment properly the first time.
Application Process: Spray Techniques and Positioning Challenges
Once the guardrail blank exits the drying stage, it enters the spray booth where the powder coating is applied electrostatically.
Electrostatic Principle
A high-voltage electrostatic gun (typically 60–90 kV) imparts a negative charge to powder particles. The grounded guardrail acts as a positive electrode. Powder particles are attracted across the air gap and deposit on the surface. This is far more efficient than liquid spray, where much paint drifts away.
Spray Gun Configuration for Guardrails
Guardrails present a specific challenge: they are long, often with internal welds, edge details, and sometimes hollow sections. A single spray gun positioned perpendicular to a flat surface will produce excellent coverage on the face—but poor coverage on the sides, ends, and inside edges. This is partly the Faraday cage effect—electric field lines concentrate on outer edges and have difficulty penetrating internal or recessed geometry.
To manage this, professional guardrail coating lines typically use:
- Multiple spray guns (2–4 guns per linear section) positioned at different angles and heights
- Gun articulation systems (automatic or manual) that adjust angle and distance to ensure edges and welds receive adequate powder
- Rotating or oscillating fixtures for smaller guardrail components, allowing all-around coverage from a single gun
Distance and Parameters
- Gun-to-surface distance: 150–250 mm (varies by gun model and powder type)
- Primary voltage: 60–85 kV (too high causes back-ionization and repulsion; too low gives poor transfer)
- Current: 10–18 µA typical
- Primary air (atomization): 3–5 bar
- Pattern (oscillation if manual spray): Smooth, overlapping strokes
For guardrails, consistency is more important than speed. A slow, deliberate, overlapping spray pattern will produce better coverage than a fast pass. We recommend guardrail lines set their spray pace such that a single section receives at least 10–15 seconds of direct spray contact.
Powder Charge and Deposition
Good powder coating depends on the powder's ability to hold charge and transfer to the substrate. Older or moisture-contaminated powder loses charge and won't deposit evenly. For guardrail work:
- Store powder in dry, cool conditions (below 25°C, <50% RH)
- Use only fresh powder (check batch date; powder >6 months old loses performance)
- Maintain a closed-loop recovery system to prevent powder contamination
Curing and Cooling: Environmental Factors and Process Control
After spray deposition, the guardrail must be cured—a process where heat causes powder particles to melt, flow, and chemically cross-link.
Curing Temperature and Time
Most powder systems (polyester, epoxy-polyester blends) cure at 180–200°C for 10–20 minutes. The exact parameters depend on the powder supplier's technical data sheet. Manufacturers often don't check the data sheet—and then wonder why hardness or adhesion suffers.
Critical Point: Measure Actual Workpiece Temperature, Not Air Temperature
The most common mistake is monitoring oven air temperature and assuming the guardrail is at the same temperature. In reality:
- A thin guardrail section might reach 190°C when the oven air is 220°C
- A thick, multi-weld guardrail might lag by 20–30°C
- Guardrails loaded densely onto the conveyor may shade each other and cool more slowly
Professional guardrail lines use infrared thermometers or thermocouples on sample pieces to verify actual workpiece temperature and adjust oven setpoint or line speed accordingly.
Seasonal Adjustments
Guardrail coating quality varies with ambient temperature:
- Winter (cold shop): Parts enter the oven colder, so they may need longer dwell time or higher setpoint to reach cure temperature
- Summer (hot shop): Parts may over-cure or reach cure temperature too quickly, risking gloss loss or brittleness
We recommend adjusting cure parameters monthly based on seasonal ambient conditions.
Cooling Stage
After exiting the oven, the guardrail is still hot (typically 100–150°C) and chemically active. It must cool before handling:
- Active cooling (forced air): Faster, but requires careful duct design to avoid thermally stressing thin sections (risk of warping or coating cracking)
- Passive cooling (air exposure): Slower, but safer; typically 30–60 minutes to ambient
Our recommendation: For guardrails with complex geometry or thin welds, use passive cooling or low-velocity forced cooling. The extra time is worth the reduced defect risk.
![spray powder coating booth]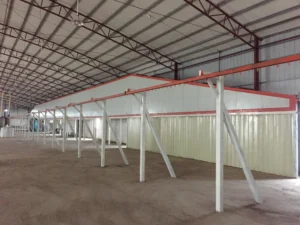
Critical Quality Standards and Inspection Methods for Guardrail Coatings
Every guardrail coating system should meet or exceed the standards set by relevant authorities. In the United States, ASTM B117 (salt-fog testing) and ASTM D3359 (adhesion) are common. In Europe, EN ISO standards apply. Regardless of region, the core measurables are the same.
Film Thickness Uniformity and Testing Requirements
Why Thickness Matters
A 75-micron coating provides better protection than a 50-micron coating. But a 100-micron coating with thin spots (40 microns at a weld, 60 microns at an edge) is worse than a uniform 70-micron coating, because the thin spots rust first.
For guardrails, we recommend:
- Target thickness: 75–100 microns (3–4 mils)
- Acceptable range: 65–110 microns
- No spot below 60 microns (this is a fail criterion)
- Special attention to welds, edges, inside bends, and mounting holes—these are high-stress areas where corrosion initiates
Measurement Method
Use an electromagnetic gauge (gage) calibrated to the substrate (steel). Take measurements at:
- Flat face centers (3–5 points per panel)
- Weld lines (before and after)
- Edges and ends (top and bottom)
- Inside surfaces and bends (if applicable)
- Mounting holes and fastener areas
Frequency
For small guardrail runs (< 50 pieces), measure every piece. For high-volume production, implement statistical process control: measure first piece after setup, then one piece per hour (or per 20 pieces), and any time parameters change.
Adhesion, Hardness, and Corrosion Resistance Verification
Adhesion Test (ASTM D3359 – Cross-Hatch Adhesion)
This is the most practical field test. Using a special cross-hatch knife tool, cut a grid pattern into the coating and use tape to pull away the coating. Ratings are 5B (perfect; no removal) down to 0B (complete removal). Guardrails should achieve 5B or 4B minimum. Anything below 4B suggests pre-treatment failure and is a sign of future field failure.
Hardness Test (Pencil Hardness, ASTM D3363, or Knoop/Vickers)
A simple field check: use a series of hardness pencils (HB, H, 2H, 3H, etc.) to scratch the coating. The hardness of the hardest pencil that does not scratch indicates surface hardness. Guardrails should achieve H or 2H minimum to resist mechanical wear and scratching during transport and installation.
Salt-Fog Testing (ASTM B117)
This is the definitive durability test:
- Guardrails are exposed to 5% salt solution fog at 35°C
- Red rust is measured (not white salt corrosion)
- Industry targets: 750–1000 hours minimum before red rust appears
- Premium guardrails (for coastal zones): 1000+ hours
Salt-fog testing is expensive and time-consuming (takes 2–4 weeks), so most production lines don't run it on every batch. Instead, conduct quarterly or semi-annual testing on representative samples. If a batch fails salt-fog, immediately investigate:
- Pre-treatment bath concentration (is it depleted?)
- Cure temperature/time (verify with actual measurements)
- Powder lot (has the supplier changed formulation?)
- Spray parameters (was coverage adequate?)
Gloss and Color Consistency
Less critical than durability, but important for appearance:
- Gloss (ASTM D2457): Should be consistent within ±10 units
- Color (visual or spectrophotometry): Should match approved standard (if customer specified)
Gloss loss or yellowing over time is normal and acceptable if driven by UV exposure, not by cure problems. But if gloss is uneven across a batch, suspect over-cure or temperature gradients in the oven.
![automated coating line spray system]
Common Defects in Guardrail Powder Coating and How to Prevent Them
After reviewing hundreds of guardrail coating projects, we've identified a handful of defects that repeat. Here's what causes them and how to fix them.
Internal Powder Accumulation and Faraday Cage Effect
The Problem
Hollow or semi-hollow guardrail profiles (box sections, C-channels) are prone to uneven powder deposition. The interior surfaces don't receive as much powder as the exterior, and powder can accumulate in corners and pockets, creating thin spots and areas of high build that later craze or blister.
Why It Happens
Inside a hollow section, the electric field is weaker. Powder particles don't transfer as efficiently. If the rail is rotated during spray, powder can bounce around inside and settle unevenly. This is the Faraday cage effect in practice.
Prevention
- Increase spray time for hollow sections (allow 15–20 seconds per surface, not 5–10)
- Rotate or oscillate the part during spray so all interior surfaces receive direct gun exposure
- Use lower electrical voltage (65–75 kV instead of 85 kV) to reduce powder repulsion inside cavities
- Reduce powder feed rate slightly to prevent excessive accumulation
- For high-volume runs, consider two-sided spray (flip the part halfway through the booth) so exterior and interior receive equal coverage
Color Inconsistency and Powder Waste Management
The Problem
A batch of guardrails appears "streaky" or patchy—some sections are darker, some lighter, even though they were sprayed at the same time with the same settings.
Why It Happens
Most often because of mixed powder lots. When guardrails are coated with a color change, leftover powder from the previous color is not fully purged from the system. Recovery powder (overspray that was collected and re-used) mixes with fresh powder, creating off-color spots.
Prevention
- Implement strict powder segregation: Keep recovery powder separate from fresh powder. Don't mix them.
- Purge the system between color changes: Use compressed air to blow out all residual powder from the spray gun, powder lines, and recovery hopper before introducing new color
- Limit recovery powder reuse: We recommend using recovery powder for no more than 30% of a batch. After 3–5 recycles, material degrades and loses charge
- Check powder moisture: Wet powder from humid storage loses color saturation and transfer efficiency. Store powder in sealed drums with desiccant packs
- For high-end guardrails (visible finish): Consider one-time-use powder (no recovery recycling) to guarantee color consistency
Coating Failure at High-Stress Zones (Welds, Corners, Edges)
The Problem
Rust appears first at weld lines, sharp corners, or the top edges of guardrail sections. These areas are thin-coated or have adhesion loss.
Why It Happens
The Faraday cage effect concentrates electric field lines at sharp edges and corners, causing back-ionization—powder bounces away from these zones instead of depositing. Additionally:
- Welds are often oxidized and require extra cleaning
- Tight corners trap water during pre-treatment, preventing complete drying
- High-stress areas flex during installation, stressing the coating bond
Prevention
- Extended pre-treatment for welds: High-pressure spray rinse directed at weld lines to remove oxide
- Phosphate bath temperature check: At welded joints, phosphate conversion should be extra thorough (longer dwell time or higher temperature)
- Lower spray voltage near edges: If using multi-gun setup, use 5–10 kV lower voltage on guns aimed at edges and corners
- Increase powder thickness at these zones: A 90–100 micron coating at edges vs. 75 microns at flat surfaces
- Post-spray touch-up: For critical guardrails, manually touch up thin spots with a small powder gun or brush-applied powder
Our recommendation: On the first guardrail from any new fabricator, use a scanning electron microscope (SEM) to inspect coating thickness at welds and edges. Many coating failures aren't due to the coating system—they're due to inadequate pre-treatment of the metal itself.
Environmental Considerations: Seasonal Adjustments and Long-Term Durability
Guardrails will spend 10–20 years outdoors. The powder coating's durability depends not just on formulation, but on how the curing process is tuned to ambient conditions.
Temperature Effects on Cure
Powder cures via a thermosetting reaction that accelerates with heat. At 180°C, a typical epoxy-polyester powder cures in ~15 minutes. At 170°C, it might take 25 minutes. At 190°C, it might complete in 8 minutes but risk over-cure.
In winter, when the coating shop is unheated or cold:
- Metal parts enter the oven at 10–15°C instead of 20–25°C
- They need longer dwell time to absorb the same heat energy
- Oven residence time should increase by 20–30%
In summer, when the shop is hot:
- Parts enter the oven pre-warmed
- They reach cure temperature faster
- Risk of over-cure increases, manifesting as gloss loss, brittleness, or color shift
Humidity Effects on Pre-Treatment
High summer humidity (>70% RH) makes drying more difficult. Moisture lingers on the surface longer, allowing brief flash rusting to occur before the phosphate layer fully forms. In these conditions:
- Extend drying time by 5–10 minutes
- Increase air temperature by 5–10°C
- Consider a secondary drying stage with dehumidified air
UV and Long-Term Gloss Retention
Guardrails in direct sunlight will fade and lose gloss over time. This is normal and not a coating defect. However, certain powder formulations hold gloss better:
- Polyester-based powders: Good UV stability, retain gloss 5–10 years in temperate climates
- Polyester-urethane blends: Better gloss and color retention, recommended for high-visibility guardrails
- Epoxy powders alone: Poor UV stability; not recommended for long-term outdoor use without top-coat
Specify powder formulation at the time of purchase, not after failures appear.
Salt-Spray Environments
If guardrails are destined for coastal areas, highways with winter salt treatment, or industrial facilities with salt-air exposure:
- Use a zinc-rich epoxy primer before powder coating (two-coat system)
- Or specify a maximum-durability epoxy-polyester powder with enhanced zinc phosphate pre-treatment
- Plan for inspection and touch-up every 3–5 years
Optimizing Curing Equipment and Production Efficiency for Large-Scale Guardrail Manufacturing
A guardrail coating line is only as fast as its slowest stage. In many operations, that's the curing oven.
Oven Design Considerations
- Temperature uniformity: Hot spots (>210°C) and cold spots (<170°C) within the same oven chamber will produce inconsistent hardness and gloss. Modern lines use high-velocity hot-air circulation to maintain ±10°C uniformity
- Residual heat recovery: Exiting parts are still 80–120°C; capture that heat via recuperators to pre-warm incoming air, reducing fuel/electric consumption by 20–30%
- Conveyor speed: Often, the line speed is set based on spray booth capacity, not oven capacity. If the spray booth can handle 20 pieces/hour but the oven is undersized and can only cure 15/hour, you have a bottleneck. Size the oven first, then tune spray booth around it
- Product density loading: How many guardrails per linear meter of conveyor? Overloading reduces air circulation and uneven cure. Underloading wastes energy. Aim for 70–80% space utilization
Curing Time vs. Throughput Trade-off
A 10-minute cure at 190°C is faster than a 15-minute cure at 180°C. But:
- Higher temperature increases energy cost and risk of over-cure
- Longer dwell time is cheaper per-piece energy but reduces throughput
For large guardrail runs (>500 pieces/week), calculate the optimal trade-off:
- Cost of energy to run the oven at 190°C for 10 min = X
- Cost of energy to run at 180°C for 15 min = Y
- If Y < X and product quality is equal, use the lower temperature
Monitoring and Control
Modern curing ovens use multi-zone temperature control with multiple setpoints and fan speeds. As a minimum, implement:
- Entrance zone: 140–160°C to begin powder flow-out
- Middle zone: 185–195°C to complete melt and cross-linking
- Exit zone: 175–185°C to stabilize (prevent re-gassing or bloom)
Use thermocouples on the product (not just air temperature) to verify actual cure is occurring. Quarterly calibration of temperature sensors is standard practice.
Energy Optimization
For high-volume guardrail lines, total energy cost can be 15–30% of total manufacturing cost. Small improvements add up:
- Install a powder pre-heater (warming powder to 25–30°C before spray increases transfer efficiency by 10–15%)
- Use variable-frequency drives (VFDs) on oven fans to reduce air circulation when not needed
- Recover exhaust heat via plate-frame heat exchangers
- Time production so the oven runs continuously (frequent start/stops waste energy)
Quality Management Strategy and Post-Coating Verification
We recommend a simple but rigorous inspection protocol:
In-Process Checks
- Spray booth: Verify gun distance, voltage, and spray pattern daily
- Pre-treatment: Test bath concentration weekly (acid number, iron content)
- Drying zone: Spot-check part temperature with IR gun; target 50–60°C
- Oven: Record air temperature in three zones hourly; check workpiece temperature on sample pieces
Post-Cure Inspection
- Visual: Check for color consistency, gloss, presence of defects (dust, pinholes, runs, thin spots)
- Cross-hatch adhesion: Test at least one sample per 50 pieces
- Thickness: Measure at 5 points per sample; ensure no spot below 60 microns
- Hardness: Pencil test or Knoop; target H or 2H minimum
Rejection Criteria
Any piece that fails the following should be reworked (stripped and re-coated):
- Visible rust or corrosion (white, yellow, or red)
- Adhesion rating below 4B (more than 1 grid cell removed)
- Thickness below 60 microns anywhere
- Large area (>1 cm²) with visible defects (dust, pinholes, runs)
Rework Process
Stripping powder coating can be done chemically (caustic solution) or abrasively (grinding, grit blasting). For guardrails, chemical stripping is preferred to avoid distorting thin sections. After stripping, the part re-enters the pre-treatment stage as if it were new.
Conclusion: Why Guardrail Coating Quality Matters
A guardrail's primary function is safety. A corroded, flaking, or failing guardrail is not just unsightly—it's a liability. From our experience working with guardrail manufacturers worldwide, we know that powder coating, when executed properly, delivers 15–20 years of reliable protection.
The difference between a system that works and one that fails often comes down to details that seem minor on paper but compound over time: proper pre-treatment chemistry, adequate drying, consistent spray coverage, measured curing temperature, and rigorous post-cure inspection.
We encourage guardrail manufacturers and specifiers to:
- Invest in pre-treatment. It's the foundation. Skip it, and everything else fails.
- Measure actual workpiece temperature during curing. Don't assume the oven air temperature is the part temperature.
- Segregate powder by color and condition. Mixing fresh and recycled powder, or different colors, causes visible defects.
- Perform adhesion and thickness testing regularly. Don't wait for field failures to discover process problems.
- Adjust seasonally. Winter and summer require different cure parameters.
- Plan for long-term durability. Specify powder formulation and pre-treatment chemistry based on the guardrail's final environment (coastal, inland, industrial, etc.).
For guardrail fabricators seeking to upgrade or establish a coating capability, we're here to help. From assessing your current process to designing and commissioning a full electrostatic powder coating line, we bring two decades of practical experience and a commitment to getting coating quality right from the first run.
Contact us today to discuss your guardrail coating requirements.
WhatsApp: +8618064668879
Email: ketumachinery@gmail.com