Understanding the Powder Coating Curing Process: From Melting to Cross-Linking
Powder coating curing is not simply "baking" powder onto a surface. It's a critical chemical transformation that determines whether your final coating will perform as expected—or fail in the field.
For manufacturing operations, getting curing right means the difference between parts that last years versus months. Yet many factories treat it as an afterthought, assuming "hotter" and "longer" always work. They don't.
I've spent years working with production lines across cabinet manufacturing, furniture, and aluminum systems. The single biggest quality leap I see happen is when operations truly understand what happens inside that curing oven.
What is Powder Coating Curing and Why It Matters
Curing vs. Drying: Understanding the Key Difference
This distinction matters more than you might think.
Drying is a physical process. Paint dries when solvents evaporate—the liquid becomes solid, but the chemical structure remains fundamentally unchanged. This is why paint coatings can sometimes be scratched or damaged years later.
Curing is a physical AND chemical transformation. Powder coating curing goes far deeper. The thermosetting resin molecules don't just lose moisture—they undergo a controlled chemical reaction called cross-linking. New molecular bonds form between resin chains, creating a three-dimensional network structure that's dramatically harder, more durable, and more chemically resistant than any dried paint film.
This is why cured powder coating can:
- Withstand higher impact forces without chipping
- Resist chemicals that would dissolve paint coatings
- Maintain adhesion through years of thermal cycling
- Survive outdoor exposure without chalking or loss of gloss
The implications are practical and measurable. A paint coating might fail salt-spray testing in 500 hours. A properly cured powder coating on the same substrate can last 2,000+ hours. That's not marketing—that's chemistry.
Physical and Chemical Changes During Curing
Physical changes happen first and are visible:
- Powder melts from solid particles into a continuous liquid film
- The molten coating flows and levels itself, filling surface irregularities
- Air bubbles rise out and escape
- The coating surface becomes smooth and uniform
Chemical changes happen simultaneously and determine final performance:
- Resin molecules break apart their original structures
- Reactive functional groups (-OH, -COOH, -NCO, depending on resin type) encounter each other in the heat
- New covalent bonds form between these groups
- The resin cross-links into an insoluble, three-dimensional network
- The coating hardens progressively from outside toward the inside
Both must complete properly. A coating can look smooth (physical transformation complete) yet still be under-cured (chemical transformation incomplete), resulting in soft touch, poor chemical resistance, and early failure.
This is why tactile inspection alone isn't sufficient quality control—you need chemical testing to verify that cross-linking actually occurred.
The Three Essential Stages of Powder Coating Curing
In my experience, understanding these stages helps operators and maintenance teams diagnose problems quickly and adjust parameters correctly.
Stage 1: Melting (Initial Fusion)
What's happening: The powder particles on the workpiece surface are receiving heat for the first time. Their temperature rises. At a certain temperature—typically between 80–120°C depending on resin type—the powder transitions from a hard, brittle solid into a soft, flowing liquid. This is the glass transition temperature (Tg) zone.
Why it matters: If melting doesn't happen completely, the coating never becomes a continuous film. You end up with powder particles that appear stuck to the surface but haven't truly fused. The result is a weak, granular coating that powder can rub off and that has poor adhesion.
How long it takes: Usually 3–5 minutes, depending on:
- Workpiece material and thickness (steel heats faster than aluminum)
- Powder particle size (finer particles melt faster)
- Oven temperature setting
- How densely parts are loaded
On-site indicator: If you look at a freshly entered part and the powder still looks like separate particles rather than a glossy film, it hasn't reached Tg yet.
Stage 2: Flow-Out (Leveling and Smoothing)
What's happening: The coating is now liquid—like a very thick, slow-moving oil. It doesn't instantly level itself. As the part continues to heat and the coating temperature rises, the molten resin becomes slightly more fluid. Gravity and surface tension cause it to flow across the workpiece surface, filling tiny gaps, smoothing out the texture left by spraying, and creating a unified, glossy appearance.
Why it matters: Flow-out is what transforms a functional coating into a quality coating. A coating that doesn't flow enough will be:
- Dull or matte in appearance
- Rough to the touch (orange-peel texture)
- Prone to adhesion issues because irregularities create stress concentration points
A coating that flows too much can:
- Run or sag on vertical surfaces
- Pool in corners
- Become so thin in some areas that corrosion protection fails
How long it takes: Typically 5–10 minutes at proper temperature. This is why oven dwell time (total time inside the oven) is so critical.
On-site indicator: A properly leveled coating should feel smooth when you run your finger gently across it (once cool). Any roughness or orange-peel texture signals either that flow-out wasn't adequate or that the coating was too thick.
Stage 3: Cross-Linking (Chemical Transformation)
What's happening: While flow-out is happening, something chemical is occurring simultaneously. The resin molecules in the molten coating are being heated to their cure temperature (typically 170–220°C depending on powder system). At this temperature, the reactive groups within the resin molecules collide with sufficient energy to break their original bonds and form new, stronger bonds with neighboring molecules.
This creates a chemically bonded network—imagine starting with separate strings of beads and applying heat and pressure until they weld together into a mesh. That mesh is now much stronger and much more resistant to solvents, heat, and mechanical stress.
Why it matters: Cross-linking is what separates a powder coating from a painted part. A painted part is held together by adhesive forces between dried particles. A powder-coated part is held together by actual chemical bonds. This is why:
- Impact resistance improves dramatically
- Chemical and solvent resistance improves dramatically
- Adhesion to the substrate becomes nearly unbreakable (assuming good pre-treatment)
- The coating can flex and expand with the underlying material without cracking
How long it takes: This is where confusion often starts. Many people think curing time is just time in the oven. Actually, cross-linking requires both time AND temperature. At 190°C, full cross-linking might take 15 minutes. At 170°C, it might take 25–30 minutes. At 220°C, it might take only 10 minutes. Different powder systems have different requirements—always follow the powder supplier's technical data sheet.
Why this matters for your factory: If your oven dwell time is too short, cross-linking won't complete fully. Your parts will emerge from the oven looking perfect but will fail adhesion or chemical-resistance testing within days or weeks.
On-site indicator: Full cross-linking cannot be assessed by touch or appearance alone. It requires lab testing (adhesion tape tests, solvent rub tests, hardness testing). This is why modern powder coating lines should include periodic test coupons that get destructively tested to verify cure quality.
Critical Parameters That Control Curing Quality
Over the years, I've learned that curing failures almost never stem from a single variable. They result from multiple parameters being out of balance.
Temperature: Finding the Sweet Spot
Temperature is the most obvious control variable—and the most misunderstood.
First principle: Powder coatings are formulated to cure fully at a specific temperature range. Epoxy systems typically cure at 170–200°C. Polyester systems typically cure at 150–180°C. Polyurethane and hybrid systems may have different windows. These aren't suggestions—they're formulated chemistry.
The problem with "hotter is faster": Many operators assume that running the oven at 220°C instead of 190°C will just make parts cure twice as fast. Sometimes true. Often not. At extreme temperatures:
- The coating may cure so fast that the outer surface hardens before the interior cross-links properly, trapping unreacted material inside and creating a brittle, uneven coating
- Some powder systems can experience discoloration or gloss loss at excessive temperatures
- The resin may actually degrade slightly, losing some mechanical properties
The problem with "we run cool to save energy": Conversely, running at 160°C instead of 190°C might seem like a 15% energy saving. But if cross-linking doesn't complete, the coating will be soft, adhesion will be poor, and parts will be reworked or scrapped. The real cost is far higher than the energy saved.
What I actually do on our lines: We calibrate to the powder supplier's recommended window, typically aiming for 2–3°C below the maximum to leave safety margin. We measure the workpiece surface temperature using thermal imaging or contact thermometers, not just the oven air temperature. And we record oven temperatures continuously so we can prove to customers that parameters were met.
Time: How Long is Long Enough?
Dwell time (total time the workpiece spends inside the oven) is the second critical variable.
The relationship between time and temperature: This is where the chemistry becomes practical. Curing kinetics means that lower temperatures require longer times, and higher temperatures permit shorter times. But it's not linear.
For a typical epoxy powder system:
- At 170°C: ~25 minutes dwell time
- At 190°C: ~15 minutes dwell time
- At 210°C: ~10 minutes dwell time
If you shorten dwell time without raising temperature, or lower temperature without extending dwell time, cross-linking won't complete.
Workpiece mass matters: A thin sheet of aluminum and a thick steel casting have completely different heat-transfer characteristics. The aluminum will reach cure temperature quickly throughout; the steel casting will heat from the outside in. If dwell time is calculated for thin parts but you're actually running thick parts, the interior of your parts won't fully cure.
Oven air circulation matters: A poorly designed oven might have hot spots and cold spots. A part entering the cold spot will take longer to reach cure temperature. If dwell time is short, that part might exit under-cured while parts from the hot spot are perfect.
What I verify: On production lines we design, we use multiple temperature sensors at different points inside the oven. We run trial cycles without parts to map the temperature profile. Then we calculate dwell time based on the coldest realistic scenario, not the average or best-case scenario.
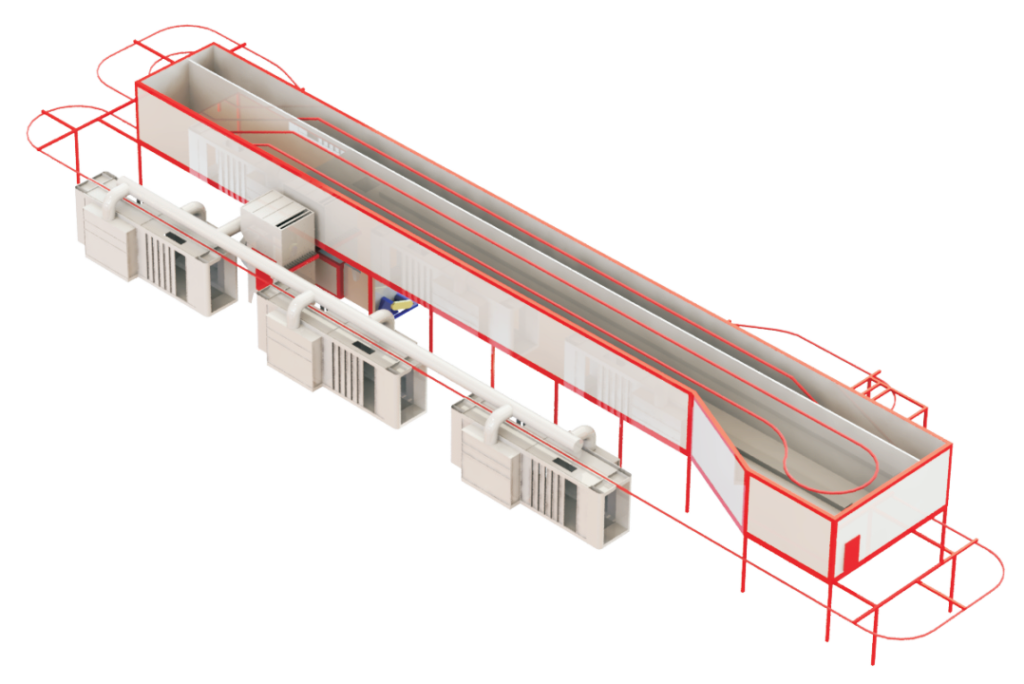
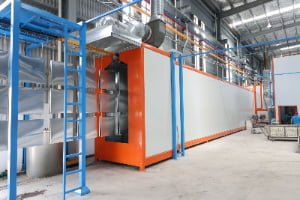
Oven Design: Uniform Heat Distribution and Air Circulation
This is where many standard ovens fail.
Poor oven design creates:
- Hot spots (front of the oven where the burner is closest)
- Cold spots (back of the oven, far from the heat source)
- Uneven air circulation, leaving pockets of cooler air
- Temperature stratification (top of the oven much hotter than bottom)
The result: Parts that exit the same oven can have different cure states depending on which corner they occupied.
What good ovens have:
- Forced air circulation with fans that distribute hot air evenly throughout the chamber
- Multiple heating elements (not just one burner) so heat is distributed, not concentrated
- Baffles and diffusers that direct airflow to eliminate dead zones
- Oven insulation (at least 100mm of rock wool) to maintain stable temperature and reduce thermal loss
- Temperature sensors at multiple points (not just one probe) to monitor uniformity
On our production lines, we typically specify ovens with ±5°C uniformity across the working chamber. That's not arbitrary—it's the difference between consistent pass rates and chronic quality issues.
Energy efficiency note: A well-designed oven with proper insulation, air circulation, and control actually consumes less energy than a poorly designed hot box that wastes heat and requires constant input to maintain temperature.
Under-Curing vs. Over-Curing: Consequences and Recognition
This is where theory meets factory reality.
What Happens When Curing is Incomplete
I've seen parts that look perfect fresh from the oven but fail within days.
Immediate consequences of under-curing:
- Soft touch: The coating feels slightly tacky or sticky, especially at 40–50°C (above normal room temperature)
- Loss of gloss: The coating may be dull or matte instead of the expected glossy finish
- Low hardness: A pencil or fingernail can scratch or mark the surface easily
- Poor adhesion: Adhesion tape tests show coating separating from the base material
- Chemical vulnerability: The coating swells or dissolves if exposed to solvents or harsh chemicals
Delayed consequences (days to weeks):
- Yellowing or color shift even at room temperature, as incomplete cross-linking slowly progresses
- Adhesion failure: Coating begins to peel or flake at edges or where the substrate flexes
- Corrosion creeping: Rust starts appearing around scratches or damaged areas
- Field complaints: Customers report coating failing months after installation
I once worked with a cabinet maker who was running under-cured coatings because they were trying to maximize throughput. They didn't discover the problem until customer returns started arriving. The cost of replacement and reputation damage far exceeded any time saved.
The Risks of Excessive Curing
Over-curing is less common but absolutely possible, especially with older ovens or manual temperature control.
Consequences of excessive temperature or time:
- Color shift: Many powders yellow or darken when over-heated
- Loss of gloss: Paradoxically, excessively high temperature can cause loss of gloss, surface wrinkling, or a dull, chalky appearance
- Brittleness: Extreme over-cure can cause the coating to become too hard and brittle, prone to chipping under impact
- Mechanical property loss: Some resin systems actually lose impact resistance or flexibility if cured beyond their optimal range
- Dimensional changes: Parts may warp or distort if the substrate is heated excessively
Over-curing is typically less problematic than under-curing because at least the coating is fully cross-linked. The main cost is aesthetic or mechanical property degradation, not safety or durability failure.
How to Identify Curing Defects
Visual inspection (immediate, fresh from oven):
- Dull or matte finish instead of expected gloss → under-cured
- Yellowing or color darker than standard → likely over-cured or excessive temperature
- Orange-peel texture → inadequate flow-out, usually due to insufficient dwell time or excessive film thickness
- Wrinkles or crawling → typically indicates moisture or contamination, not curing parameters
- Sagging on vertical surfaces → excessive dwell time or temperature, or coating applied too thick
Tactile inspection (after cooling):
- Slight tackiness when touched → under-cured
- Roughness to fingernail → under-cured
- Extreme brittleness (coating cracks when you bend a thin sample) → over-cured
Chemical testing (lab or on-site):
- Adhesion tape test (ASTM D3359): Apply tape, pull at 180° angle. If coating peels in large flakes, under-cured. If it peels in small squares (expected for good adhesion), it's properly cured.
- Solvent rub test: Rub acetone-soaked cotton on the coating surface. Under-cured coatings swell, soften, or show solvent marks. Properly cured coatings resist this.
- Hardness testing (pencil hardness): Under-cured coatings score easily with soft pencils. Properly cured coatings resist hard pencils.
- Salt spray (ASTM B117): This takes 500+ hours but is the real proof. Under-cured coatings fail early; properly cured coatings last.
My recommendation: Every production shift should include making and testing a control coupon—a small test panel coated and cured alongside production parts. Monthly destructive testing (adhesion, solvent, hardness) catches drift before customer complaints arrive.
Powder Resin Systems and Their Curing Requirements
Not all powder coatings cure the same way. This is a common source of confusion.
Epoxy Powders: Temperature and Time Profiles
Epoxy powders are the most common in industrial settings because they offer excellent adhesion, corrosion resistance, and chemical resistance.
Typical cure profile:
- Recommended temperature: 190–200°C (some systems 180–210°C)
- Typical dwell time: 12–18 minutes at recommended temperature
- Melting range: 85–110°C
- Advantages: Excellent adhesion to steel, strong chemical resistance, good mechanical properties
- Limitations: Can yellow under UV exposure (though UV-stabilized formulations exist); requires precise cure control
In practice: On our lines, we typically spec epoxy systems for indoor/protected applications (machinery, electrical cabinets, interior equipment) where UV isn't a concern. We cure at 195°C with 15-minute dwell as a standard, and any deviation requires recalibration.
Polyester Powders: Why Parameters Differ
Polyester powders are formulated differently and require different cure conditions.
Typical cure profile:
- Recommended temperature: 150–180°C (generally lower than epoxy)
- Typical dwell time: 15–25 minutes (generally longer than epoxy, to compensate for lower temperature)
- Melting range: 70–90°C
- Advantages: Excellent UV resistance, good color and gloss retention, good outdoor durability
- Limitations: Slower cure means longer oven dwell, higher energy cost; slightly less adhesion than epoxy
Why lower temperature? Polyester resins have different reactive chemistries than epoxy. Their cross-linking reactions proceed efficiently at lower temperatures. Running polyester at epoxy temperatures (200°C+) can cause over-cure, yellowing, or gloss loss.
In practice: We use polyester systems for outdoor furniture, building products, and anything exposed to weather. The lower cure temperature saves energy compared to epoxy, but the longer dwell time means oven length needs to be adequate.
Polyurethane and Hybrid Systems: Special Considerations
These are less common but increasingly used for specialized applications.
Polyurethane powders:
- Cure temperature: 150–180°C, similar to polyester
- Dwell time: 15–20 minutes
- Key advantage: Superior chemical and solvent resistance compared to polyester
- Special consideration: More sensitive to moisture during cure; compressed air used in powder supply must be very dry
Hybrid systems (epoxy-polyester blend):
- Cure temperature: 170–190°C (compromise between epoxy and polyester)
- Dwell time: 12–18 minutes
- Advantage: Balance of properties—better UV resistance than pure epoxy, better adhesion than pure polyester
- Used for: Products that need both indoor durability and some outdoor exposure
Critical practice: Always verify cure parameters with the specific powder's technical data sheet. Different manufacturers formulate differently. Running an assumption (e.g., "all epoxies cure at 200°C") is a frequent cause of quality issues.
Testing and Verifying Adequate Curing
On a well-run production line, curing verification happens in parallel with production, not after the fact.
Standard Testing Methods (Hardness, Adhesion, Chemical Resistance)
Hardness testing (pencil hardness per ASTM D3363):
- Simple: Use a set of hardness pencils (6B through 6H)
- Push the pencil across the coating at 45° angle under controlled pressure
- The hardest pencil that doesn't scratch the coating is the hardness rating
- What to expect: A properly cured epoxy typically rates 2H to 3H; polyester typically 1H to 2H
- Under-cured: Softer than specification (e.g., HB instead of 2H)
- Frequency: Test daily from trial runs; monthly from production batches
Adhesion testing (tape test per ASTM D3359):
- Apply pressure-sensitive tape firmly to the coated surface
- Pull the tape at a 180° angle, perpendicular to the surface
- Examine the removed coating: If the coating breaks into large flakes or peels in large patches, adhesion is poor (under-cured or pre-treatment failure)
- What to expect: Properly cured coating on well-prepared substrate should fail in grid pattern (many small squares), rating 4B or 5B
- Frequency: Test at least weekly
Chemical resistance (solvent rub test per ASTM D4572): - Soak a cotton pad in methyl ethyl ketone (MEK) or acetone
- Rub the coating surface for a defined number of strokes (typically 50–100)
- Examine the surface: Under-cured coatings swell, soften, or show solvent marks. Properly cured coatings show minimal effect
- What to expect: A properly cured coating should show little to no swelling or softening after 100 strokes
- Frequency: Monthly from production batches; immediately if quality issues appear
Salt spray testing (ASTM B117):
- This is the "gold standard" for long-term durability assessment
- Parts hang in a chamber with 5% salt fog, maintained at 35°C
- The test continues for 500, 1,000, or 2,000 hours depending on application
- Properly cured coatings on well-prepared steel substrates can exceed 2,000 hours
- Under-cured or under-prepared parts typically fail (red rust visible) within 500–1,000 hours
- Frequency: At least once per production run or quarterly, depending on customer requirements
Visual and Tactile Inspection Techniques
These are your first line of defense on the production floor.
Immediate post-oven inspection (while part is still warm):
- Touch: The coating should feel completely dry and smooth. Any tackiness indicates under-cure.
- Appearance: Gloss level should match the expected finish (matte, satin, or high-gloss, depending on powder specification). Unexpectedly dull finish suggests under-cure or excessive thickness.
- Texture: Run your finger gently over the surface (carefully, as parts are hot). It should feel smooth. Orange-peel texture suggests inadequate flow-out.
Cool-down inspection (after parts reach room temperature):
- Pencil hardness scratch: Lightly drag a fingernail or pencil across an inconspicuous area. Should not mark the coating if properly cured.
- Visual consistency: Check multiple parts from different positions in the oven. They should all appear identical (same color, gloss, texture). Differences suggest hot/cold spots in the oven.
- Edge inspection: Examine corners and edges closely. They cure slightly faster due to air circulation. They should not show any darkening (over-cure) compared to flat surfaces.
On-Site Quality Checks Without Lab Equipment
Not every factory has access to a well-equipped lab. Here are practical checks you can do on the production floor.
Tape test (improvised): Use common painter's tape instead of pressure-sensitive tape. Apply firmly, pull at 180°. While less quantitative than ASTM, it gives you a pass/fail indication quickly.
Solvent test (improvised): Dampen a cloth with rubbing alcohol (not ideal, but accessible) and rub a test area. A properly cured coating will resist softening. This is faster than the formal MEK rub test, though less sensitive.
Hardness test (improvised): Try scratching the coating with a coin edge or penknife. A properly cured epoxy powder should not scratch easily. This is very crude but can catch obvious under-cure.
Thermal cycling: For outdoor furniture or products, try leaving a coated sample outdoors for a month and examining for adhesion failure, corrosion creeping, or color shift. This mimics real-world conditions better than any quick test.
Customer feedback loop: If possible, maintain contact with key customers. Early notification of coating issues can catch cure problems before large batches fail.